Why Are African Daisy Leaves Turning Yellow?
Discover why African daisy leaves turn yellow, from overwatering and poor drainage to nutrient deficiencies, pests, and heat stress, with practical solutions.
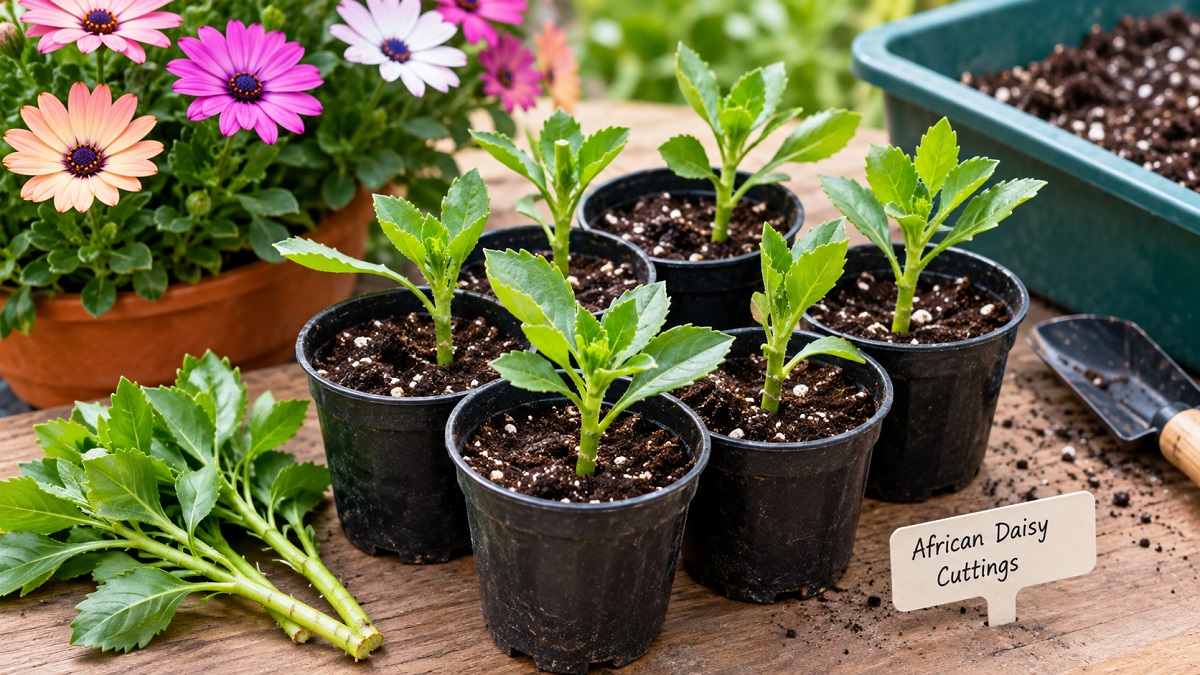
African daisies are cheerful, long-flowering plants that can bring bright color to garden beds, borders, containers, and sunny patios. If you already have a healthy plant, you do not always need to buy another one to increase your collection. Propagating African daisies from cuttings is a practical way to produce new plants that retain the characteristics of the parent plant.
The process is fairly simple once you understand which stems to choose, how to prepare them, and how to keep the cuttings from drying out before roots form. Timing also matters. A cutting taken from a strong, actively growing shoot generally has a better chance of establishing than a weak, woody, or flower-heavy stem.
This guide explains how to take African daisy cuttings step by step, what growing medium to use, how to care for the cuttings while they root, and how to recognize signs of successful propagation.
Best results come from healthy, non-flowering shoots and careful moisture control.
Look for a firm, healthy shoot with fresh leaves and no obvious signs of disease, insect damage, or severe stress. A stem that is actively growing but has not invested much energy into flowering is usually a better choice than a heavily flowering branch.
Taking several cuttings rather than relying on one gives you a better chance of ending up with multiple healthy plants.
Always use a clean, sharp pair of pruning snips or scissors. A clean cut reduces unnecessary crushing of the stem and helps limit the chance of transferring pathogens from one plant to another.
Growing African daisies from cuttings is useful when you want several plants without starting each one from seed. Cuttings are also a convenient way to preserve a particularly attractive plant. If a parent plant has the flower color, growth habit, or overall appearance you like, vegetative propagation produces new plants from that same parent.
Cuttings can also be useful when an older plant has become leggy. Instead of simply discarding pruned stems, healthy portions can sometimes be turned into new plants. This makes propagation a natural companion to regular pruning.
Another advantage is predictability. Seed-grown plants can show variation, while a cutting is genetically connected to its parent plant. That makes cuttings particularly appealing when you want to reproduce a plant with specific ornamental qualities.
The ideal time depends on your climate and the plant's growth cycle, but the most useful general rule is to take cuttings while the African daisy is actively producing healthy new growth.
Avoid taking cuttings from a plant that is severely wilted, drought-stressed, diseased, or struggling with a pest infestation. The parent plant should have enough healthy foliage to recover after a few stems are removed.
Mild weather is generally easier for propagation because extremely hot conditions can cause fresh cuttings to lose moisture rapidly. If your growing season is warm for much of the year, choose a period when temperatures are moderate and provide protection from intense afternoon sun.
You can prune a flowering plant, but flowering shoots are not usually the first choice for propagation. A non-flowering or lightly flowering shoot allows the cutting to concentrate more of its energy on producing roots rather than maintaining flowers.
Selecting the right stem is one of the most important parts of successful propagation. A poor cutting can fail even when everything else is done correctly.
Choose a stem that is green and firm rather than extremely soft and floppy or old and heavily woody. Look for several healthy leaves and avoid sections with blackened tissue, spots, damaged leaves, or obvious pest activity.
The cutting should be long enough to provide a useful section for planting while retaining several leaves above the growing medium. Avoid unnecessarily long cuttings because they can lose water more quickly and may be harder to support.
| Stem characteristic | What to look for | Why it matters |
|---|---|---|
| Color | Healthy green growth | Indicates active, living tissue |
| Texture | Firm but not excessively woody | Provides a good balance between flexibility and strength |
| Leaves | Healthy, undamaged foliage | Supports the cutting while roots develop |
| Flowers | Preferably absent | Reduces the plant's immediate reproductive demand |
| Health | No obvious disease or pest damage | Reduces the risk of propagating unhealthy material |
African daisy propagation does not require an elaborate setup. A small collection of clean tools and suitable materials is enough to get started.
Good drainage is particularly important. A cutting needs moisture, but a constantly saturated medium can create conditions that encourage stem or root problems.
Once your materials are ready, the actual process is straightforward. Work carefully rather than rushing through the cuts.
If the parent plant is noticeably dry or wilted, allow it to recover before taking cuttings. A healthy, hydrated parent provides stronger material and is better able to cope with pruning.
Select a vigorous shoot with healthy leaves. Ideally, choose a section without a large flower head. Examine both sides of the leaves and the stem before cutting.
Using clean, sharp scissors or pruning snips, make a neat cut below a leaf node. Avoid crushing or tearing the stem.
Gently remove the leaves from the lower portion of the cutting, leaving several healthy leaves toward the top. The portion without leaves will be inserted into the propagation medium.
If the remaining leaves are particularly large or numerous, reducing some foliage can help limit water loss. Do not strip the entire cutting of leaves; the remaining foliage still plays an important role in supporting the cutting.
Rooting hormone is optional. If you use it, apply it according to the product instructions and avoid excessive amounts. African daisies can be propagated without relying on rooting hormone.
Make a small planting hole in the prepared medium rather than forcing the stem directly into compacted material. Place the lower stem into the hole and gently firm the medium around it.
Moisten the medium thoroughly enough to settle it around the stem. Excess water should be able to drain away freely.
Place the container somewhere bright but protected from intense direct sunlight. Fresh cuttings can dry out quickly under strong afternoon sun before their developing roots are able to replace lost moisture.
The propagation medium needs to perform two jobs at once: hold the cutting securely and provide enough moisture without remaining waterlogged.
A light, well-draining propagation mix is preferable to dense garden soil. A compact medium can stay wet for too long and may restrict air around the developing roots.
The medium should hold together slightly when moist but should not become muddy or sticky. When you squeeze a small amount, it should not release a large amount of water.
Small pots with drainage holes are ideal. Reusing containers is fine when they have been cleaned thoroughly before planting new cuttings.
The first few weeks are mostly about preventing stress. Until roots develop, the cutting has limited ability to replace water lost through its leaves.
Place the cutting in a bright location with filtered or indirect light. Too little light can leave the cutting weak, while strong midday or afternoon sunlight can cause rapid moisture loss.
Check the growing medium regularly. Water when necessary to prevent it from becoming excessively dry, but do not keep the pot permanently saturated.
A moderately humid environment can reduce moisture loss from the leaves. A loose humidity cover can be useful, but fresh air still needs to circulate. If condensation remains heavy for long periods, ventilation should be increased.
Newly planted cuttings do not need a heavy feeding program. The priority at this stage is root formation. Once the cutting has developed a healthy root system and begins active new growth, normal plant care can gradually resume.
Root development is not always visible from above, so patience is important. A cutting may appear unchanged for a while before producing obvious new growth.
One of the most encouraging signs is fresh growth from the upper portion of the cutting. This does not prove that a large root system has formed, but it can indicate that the cutting is becoming established.
You can also check very gently by lifting the cutting only when necessary. Do not repeatedly pull on it because newly formed roots are delicate and can easily be damaged.
Once a healthy root system has developed, the cutting should hold more firmly in the medium and can begin transitioning toward normal growing conditions.
Do not rush the transplanting stage. A cutting that has only a few fragile roots can struggle when moved into a larger container or exposed to harsher outdoor conditions.
Move the rooted cutting into a container with drainage holes and fresh, well-draining potting mix. The new container does not need to be dramatically larger than the root system.
Remove the young plant gently and avoid pulling on the stem. Support the root ball and surrounding medium whenever possible.
Keep the young plant in bright light while gradually adjusting it to stronger outdoor conditions. A sudden move from protected propagation conditions into hot direct sun can cause unnecessary stress.
Once established, the young African daisy can be treated like a mature plant. Give it appropriate sunlight, good drainage, regular watering when needed, and enough room for its roots and foliage to develop.
| Problem | Possible cause | What to do |
|---|---|---|
| Cutting wilts quickly | Excessive water loss or intense light | Move it to bright indirect light and maintain suitable humidity |
| Stem turns soft or dark | Excess moisture or unhealthy cutting material | Check drainage and remove affected material |
| Leaves yellow | Water stress, excessive moisture, or natural leaf loss | Check the medium and adjust watering |
| No visible growth | Roots may still be developing | Give the cutting more time and avoid unnecessary disturbance |
| Cutting dries out | Low humidity or insufficient moisture | Improve humidity and check the medium more frequently |
| Leaves develop spots | Possible disease or excessive moisture | Improve air circulation and remove badly affected tissue |
Most failures can be traced to a few simple problems. Avoiding them will make the process much more reliable.
A plant already struggling with drought, pests, disease, or severe nutrient stress is not the best source of propagation material. Improve the parent's condition first.
Dirty pruning tools can transfer unwanted organisms between plants. Clean your scissors or snips before taking cuttings, particularly when working with several plants.
A large amount of foliage can increase water loss before roots have developed. Keep enough healthy leaves for the cutting to remain productive without creating unnecessary demand for water.
It is tempting to water frequently because the cutting has no established root system. However, constantly saturated conditions can be more harmful than slightly drying between waterings.
Strong sunlight can quickly dehydrate an unrooted cutting. Start with bright, indirect light and gradually increase exposure as the plant becomes established.
Propagation requires patience. Pulling a cutting out every few days to inspect it can damage fragile roots just as they begin to form.
If the parent plant is healthy, taking several suitable cuttings is generally more sensible than depending on one stem. Not every cutting will necessarily root at the same rate, and having several gives you room for natural variation.
However, avoid removing so much growth that the parent plant is left weak or unattractive. Propagation should work alongside normal pruning rather than replacing it.
Stem cuttings can sometimes be encouraged to produce roots in water, but a well-draining propagation medium is generally a more practical approach when the goal is to establish a strong young plant.
Water propagation also requires regular monitoring because the cutting is completely dependent on the water environment until roots develop. If you prefer water propagation, keep the foliage above the water and provide bright, indirect light. Once useful roots have formed, move the plant carefully into a suitable potting medium.
For a straightforward garden propagation routine, however, planting the cutting directly into a light rooting medium avoids an additional transition later.
Once rooted, young African daisies can be grown in containers, mixed planters, borders, or other suitable sunny locations. Give new plants time to establish before expecting the same flowering performance as a mature specimen.
Container-grown plants are particularly convenient because you can control the growing medium and move them when weather conditions become difficult. In garden beds, good drainage and appropriate sunlight become especially important.
When several propagated plants are established, spacing them properly helps maintain airflow and gives each plant enough room to develop naturally.
If you want a quick routine to remember, keep the process simple: choose a healthy parent, cut a vigorous shoot, remove the lower leaves, plant the stem in a light medium, maintain moderate moisture, provide bright indirect light, and wait patiently for roots.
The biggest mistake is usually trying to force the process. Cuttings need time to shift from maintaining existing foliage to producing new roots. Once that transition happens, growth above the soil becomes much easier to manage.
Propagating African daisies from cuttings is a useful skill for gardeners who want more plants from an established favorite. The technique is simple, but the small details matter: start with healthy material, make clean cuts, use a well-draining medium, control moisture, and protect fresh cuttings from harsh conditions.
Once roots have developed, give the young plants time to adjust before moving them into their permanent containers or garden positions. With a little patience, a few healthy shoots can become a new group of African daisies ready to add color to the garden.
Continue exploring our gardening guides with more plant profiles, growing tips, and practical advice for creating a healthy, productive garden.