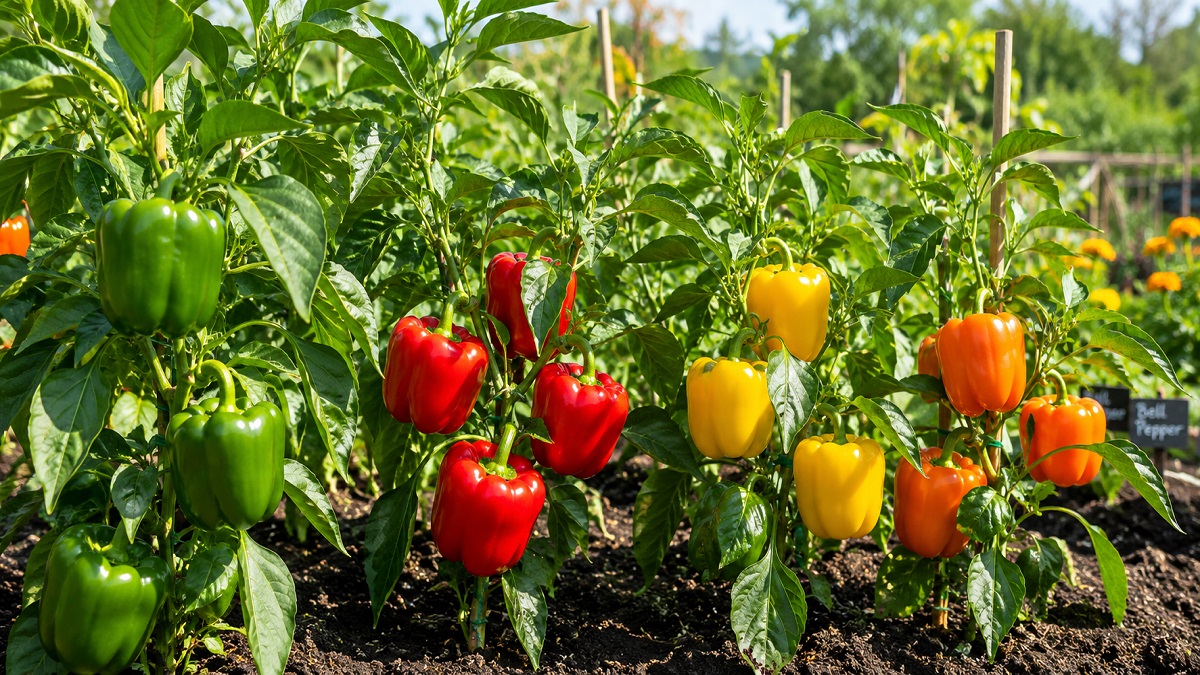
Healthy bell pepper plants (Capsicum annuum) growing in a sunny garden, producing colorful, thick-walled peppers ready for harvest.
There is a profound satisfaction in walking out to your backyard garden on a warm summer evening, reaching beneath a canopy of emerald leaves, and snapping off a glossy, heavy bell pepper that is fully ripened to a brilliant crimson or golden yellow. If you have ever purchased peppers from the grocery store only to find them watery, dull, or strangely metallic in flavor, growing your own will open an entirely new culinary world.
Bell peppers (Capsicum annuum) belong to the Solanaceae family, alongside tomatoes, eggplants, and potatoes. While they are technically tropical perennials grown as warm-season annuals in most temperate zones, they have earned a reputation among home gardeners as being slightly temperamental. They demand warm soil, consistent moisture, precise nutrition, and plenty of sunlight. However, once you understand their underlying physiological needs, managing them becomes intuitive and intensely rewarding.
Quick Care Overview
At-a-Glance Growing Checklist: Keep these four core environmental targets in mind for optimal pepper health.
Before popping a single seed into soil, you need to select varieties that fit your local climate, growing season length, and preferred culinary uses. All sweet bell peppers start out green before maturing into their final color—whether red, yellow, orange, chocolate, or purple. However, different cultivars offer distinctly varying days to maturity, disease resistances, and yield habits.
If you live in a northern climate with a brief, cool summer, choosing a short-season variety like 'King of the North' or 'Ace' can spell the difference between harvesting bushels of sweet, fully colored peppers or being left with late-season green pods frozen on the vine. Conversely, gardeners in hot southern climates need heat-tolerant hybrids like 'California Wonder' or 'Aristotle' that maintain blossom set even when temperatures top 90°F (32°C).
Variety Name
Mature Color
Days to Harvest
Best Suited Climate
Key Characteristics
California Wonder
Deep Red
75–80 Days
Warm / Temperate
Open-pollinated heirloom; thick walls, ideal for stuffing and roasting.
King of the North
Bright Red
65–70 Days
Cool / Short Season
Bred specifically to set heavy fruit in cooler summer conditions.
Golden Star Hybrid
Golden Yellow
70–75 Days
Versatile / Adaptable
Extremely sweet when fully golden; strong resistance to Tobacco Mosaic Virus.
Chocolate Beauty
Rich Brown
80–85 Days
Warm Summer
Unique savory-sweet flavor profile; striking dark foliage and pods.
Flavorburst Hybrid
Vibrant Orange
75–80 Days
Temperate / Hot
High yields of citrusy, exceptionally sweet bell peppers with thick walls.
2. Seed Starting & Indoor Germination
Because pepper plants grow slowly during their juvenile phase, starting seeds indoors is mandatory for nearly all gardeners outside the tropics. Plan to start your seeds 8 to 10 weeks before your average last spring frost date.
The most common mistake gardeners make at this stage is trying to germinate pepper seeds at ambient room temperature (65°F to 68°F). While tomato seeds will happily pop up under these conditions within a week, bell pepper seeds will linger for 3 to 4 weeks or simply rot in damp soil. Pepper seeds demand a bottom warm zone of 80°F to 90°F (27°C to 32°C) for rapid, uniform germination.
Step-by-Step Germination Protocol
1. Pre-Moisten Seed Starting Mix: Use a light, sterile, peat- or coco-coir-based medium. Moisten it until it holds together like a wrung-out sponge before filling your seed cell trays.
2. Sow at Proper Depth: Plant pepper seeds 1/4 inch deep. Firm the soil mix lightly over the seed to ensure intimate contact without over-compacting.
3. Apply Bottom Heat: Set cell trays on an electric seedling heat mat set to 85°F. Cover with a plastic humidity dome to keep soil moist until sprouts break ground.
4. Immediate Bright Light: The instant seedlings emerge, remove the humidity dome and place plants under high-output LED or T5 fluorescent grow lights positioned just 2–3 inches above the canopy.
3. Soil Preparation & Soil Temperature Secrets
Bell peppers are notoriously sensitive to cold soil. Planting them out into soil temperatures below 60°F (15°C) causes stunted growth, root shock, purple foliage due to phosphorus lock-up, and delayed fruit production that can haunt the plant for the entire season.
Work your garden soil 2 to 3 weeks before transplanting by digging in 2 to 3 inches of well-aged compost or leaf mold. Peppers thrive in loose, deep, well-draining sandy loam rich in organic matter. If you garden in heavy clay, consider building raised beds, which warm up up to two weeks earlier in spring and shed excess moisture effortlessly.
Soil Specifics for Maximum Pepper Yields
Aim for a target soil pH between 6.0 and 6.8. In this slightly acidic range, essential soil nutrients like nitrogen, phosphorus, potassium, calcium, and magnesium remain fully bioavailable to delicate feeder roots. Incorporating a handful of crushed eggshells, bone meal, or agricultural gypsum into each planting hole provides a steady supply of calcium—your ultimate defense against blossom end rot later in summer.
4. Transplanting & Hardening Off
Moving delicate indoor-grown plants directly out into bright sunlight and whipping winds will result in severe sunscald, windburn, or total crop loss. The process of hardening off gradually acclimates your plants over a 7- to 10-day period.
Start by setting your transplants outdoors in a sheltered, shaded area for two hours on Day 1. Gradually increase their outdoor exposure by 1 to 2 hours every day, slowly introducing them to gentle morning sun, full sun, and wind. By Day 10, they will be resilient enough to reside permanently in your garden beds.
Planting Out Technique
Unlike tomatoes—which can be buried deep up to their top leaves—bell peppers should be planted at the exact same depth they were growing in their nursery pots. Planting pepper stems too deep can invite stem rot pathogens near the soil surface. Space your pepper plants 18 to 24 inches apart in rows spaced 24 to 36 inches apart. Planting them slightly closer together creates a leafy canopy that shades neighboring soil, keeping roots cool and shielding delicate pepper pods from scorching sun exposure.
5. Watering Strategies & Moisture Control
If there is one aspect of pepper care that causes the most frustration, it is water management. Bell peppers possess relatively shallow root systems and require consistent, uniform moisture. Erratic watering—alternating between bone-dry drought and soggy waterlogging—is the primary driver of blossom drop, fruit splitting, and blossom end rot.
As a general rule, provide your pepper plants with 1 to 1.5 inches of water per week, increasing to 2 inches during extreme heatwaves. Always water at the base of the plant using drip irrigation, a soaker hose, or a gentle watering can. Avoid overhead sprinklers whenever possible, as wet foliage creates an ideal breeding ground for fungal pathogens like powdery mildew and bacterial leaf spot.
The Magic of Organic Mulch
Once your garden soil has thoroughly warmed up in late spring (soil temperatures consistently above 65°F), apply a 2- to 3-inch layer of organic mulch around your pepper plants. Clean straw, shredded bark, or chopped leaves work wonders:
Suppresses weed competition that steals water and nutrients.
Evens out soil moisture fluctuations dramatically between waterings.
Keeps soil temperatures cool during triple-digit midsummer spikes.
Prevents soil-borne fungal spores from splashing onto lower leaves during rains.
6. Fertilization & Micronutrient Balance
Feeding bell peppers requires a balanced approach. Nitrogen promotes robust green stem and leaf growth, but an overabundance of nitrogen will result in massive, dark-green bushes with zero flowers or fruit.
When transplanting out, feed your plants with a high-phosphorus starter fertilizer (or an organic liquid kelp/fish emulsion blend) to encourage deep, vigorous root development. Once the plants begin blooming and setting fruit, shift to a fertilizer low in nitrogen but high in phosphorus and potassium (such as an N-P-K ratio of 5-10-10 or 3-5-7).
Plant Growth Stage
Primary Nutrient Focus
Recommended Organic Fertilizer
Application Frequency
Early Transplant Stage
Balanced Nitrogen & Phosphorus
Diluted Fish Emulsion + Liquid Kelp
Every 10–14 Days
Vegetative Growth Phase
Moderate Nitrogen
Aged Compost Tea / Balanced 5-5-5
Every 2 Weeks
Flowering & Fruit Set
High Phosphorus & Potassium
Bone Meal / Organic 3-8-8 Blend
Every 3 Weeks
Mid-Summer Production
Potassium, Calcium, Magnesium
Epsom Salt Foliar Spray + Gypsum
As Needed / Monthly
7. Pruning, Topping, and Staking Mechanics
The debate around topping pepper plants (cutting off the central growing tip when the plant is 6 to 8 inches tall) is ongoing among gardeners. Topping removes apical dominance, forcing the plant to bush out with numerous side branches. In regions with long growing seasons, topping produces a bushier plant capable of carrying more total fruit. However, in short-season northern regions, topping delays early flowering by 2 to 3 weeks, which can reduce total harvested yields before autumn frosts arrive.
Early Flower Removal
Regardless of whether you top your plants, you should always pinch off any flowers or tiny pepper pods that form when the plant is under 10 inches tall. Allowing a young 6-inch plant to channel its energy into developing a single early pepper will permanently stunt the bush, yielding a tiny plant with a solitary pepper instead of a 3-foot bush carrying a dozen heavy pods later in the season.
Staking & Support Systems
As bell peppers fill out with thick-walled fruit, their branches become surprisingly brittle. High summer winds or thunderous afternoon rainstorms can easily snap heavy branches right off the main trunk. Support your plants early by inserting a sturdy wooden or bamboo stake next to each transplant, or use small tomato cages. Secure stems to the support using soft garden ties or stretchy plant tape every 8 to 12 inches as the plant climbs.
8. Pest Management & Disease Prevention
Keeping bell peppers healthy requires vigilance, but most common garden pests can be managed organically without resorting to harsh synthetic chemicals. Inspect the undersides of leaves twice a week to catch infestations early.
Common Pepper Pests & Organic Solutions
• Aphids: Tiny green, black, or pink insects clustering on tender new growth. Wash them off with a strong jet of hose water, or spray thoroughly with insecticidal soap or pure cold-pressed neem oil.
• Hornworms: Massive green caterpillars that can defoliate an entire plant overnight. Hand-pick them in late evening or use Bacillus thuringiensis (Bt), a natural biological control spray.
• Flea Beetles: Tiny black beetles that chew pinhole-sized holes in young leaves. Cover vulnerable young transplants with lightweight floating row covers until plants mature.
9. Harvesting Techniques & Ripening Stages
One of the great pleasures of growing bell peppers is that they are edible at virtually every stage of growth. You can harvest peppers when they are firm, full-sized, and green, or leave them on the vine to turn red, yellow, orange, or purple.
Keep in mind that as peppers shift from green to their fully mature color, their sugar content skyrockets, while vitamin C and vitamin A concentrations double. However, leaving fruit on the vine to mature completely signals to the plant that its biological reproductive job is nearing completion, which slows down the production of new blossoms. Harvesting green peppers frequently encourages the plant to continually set new blooms throughout summer!
Proper Harvesting Technique
Never yank or pull a pepper off the plant by hand! Pepper stems are tough and fibrous; pulling can snap entire fruiting branches or strip off bark from the main stem. Always use a clean, sharp pair of pruning shears or floral snips to slice through the thick stem, leaving a 1/2-inch stub of stem attached to the fruit. Store freshly harvested peppers unwashed in your refrigerator crisper drawer, where they will stay fresh and crisp for up to two weeks.
10. Frequently Asked Questions
Q: Why are my bell pepper flowers dropping off without forming peppers?
Blossom drop in bell peppers is almost always caused by temperature extremes. If daytime temperatures soar above 90°F (32°C) or nighttime temperatures fail to drop below 75°F (24°C)—or conversely drop below 55°F (13°C)—pepper pollen becomes sterile, causing the plant to drop its blooms. Excessive nitrogen fertilizer and soil moisture stress can also trigger blossom drop.
Q: Can I grow bell peppers successfully in pots or containers?
Absolutely! Bell peppers thrive in containers. Choose a pot that holds at least 5 gallons of volume (12 inches in diameter and depth per plant) with multiple drainage holes. Fill it with a high-quality, lightweight potting mix enriched with compost. Container-grown peppers dry out faster than garden beds, so they may require daily watering during the heat of midsummer.
Q: How do I know when my peppers are ready to pick?
Green peppers are ready to harvest when they feel firm, thick-walled, and reach 3 to 4 inches in size. If you are waiting for full color (red, yellow, or orange), wait until the pepper has completely turned color over at least 80–90% of its surface and yields very gently to firm pressure.
Q: What are the best companion plants for bell peppers?
Excellent companion plants include basil (which deters thrips and hornworms), marigolds (which repel soil nematodes), onions, carrots, and spinach. Avoid planting peppers near fennel or brassicas like cabbage and broccoli, which compete heavily for nutrients and can inhibit pepper growth.